This article explains how to use the R365 FTP Site to upload AP Invoice, AP Credit Memo and Documents to Process files.
Step 1: Add Files
When you are ready to import files via FTP, open the FTP folder (or use your preferred FTP Client) and copy/paste or drag/drop the files in to the main folder. You do not need to copy the files in to a specific folder, as the FTP service will scan the file extension and direct the file to the correct import destination.
Now when you have files to import, browse to the FTP folder just like any other folder you would browse to on your PC or Mac. For example, on a PC open Windows Explorer folder (as if you were going to My Documents) and you'll see the new folder you created named R365 FTP in the left hand navigation section. Be sure not to add/delete any folders as each one is required for the process.
After a file is transferred to the FTP, it will automatically be routed to either the 'Processed' folder (meaning that it processed correctly into the system) or into the 'ErrorLog' folder. See below for additional information about the ErrorLog folder.

Step 2: Validate Import
Once you have placed the invoices in the APImports / ARImports folder for processing They will be automatically imported. The processing time varies, but will usually be completed within thirty seconds to two minutes. You can refresh the FTP folder by clicking the refresh arrow to the right of the file path bar:

- When the files no longer appear in the main folder, they have been processed.
- If the import is successful you will see the invoice appear in the AP Transaction List View in R365
- If one or two minutes have passed and you do not see the invoice appear in R365, you will need to check the 'Errorlog'
Step 3: Reviewing Errors
To access the ErrorLog, you will need to open the corresponding imports folder. In this example, the 'APImports' folder will be opened:

Next, open the 'R365' folder:

This folder will contain the 'ErrorLog' and 'Processed' folders:

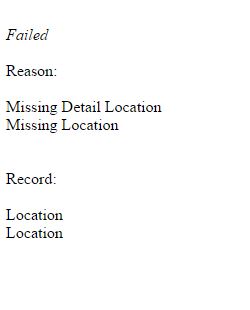
The ErrorLog folder will contain files that were unable to be imported along with an 'ERR.html' file to explain why the import failed:
A typical error log would look like this. This error indicates that the Location Name or Number was missing or did not match the Location Name or Number in Restaurant365.
Step 4: Fixing Errors and Reimporting
Refer to the Troubleshooting Errors article for more information on specific errors.
If the error is the result of bad data that has been provided by your Vendor, you will need to identify the error (Incorrect Location Number etc.) and work with your Vendor to update the value in the file.
You can alternatively manually correct the file and re-import by following these steps:
- Copy and paste the file to your desktop
- Rename the file
- Manually update the error values
- Copy and paste the updated and renamed file back in to the FTP Folder
This will allow the file to be re-imported. This is a very manual process, so for AP/AR Imports, we recommend that you work with your Vendor/Customer to correct the file errors for future error-free and seamless imports.


